Even though it's been a good long while since the kitchen was "done" enough to be functional and for us to forget about all the final details, it still feels necessary to write a recap, because as the last couple weekends, we cranked out the last few projects and the kitchen is (practically) done!
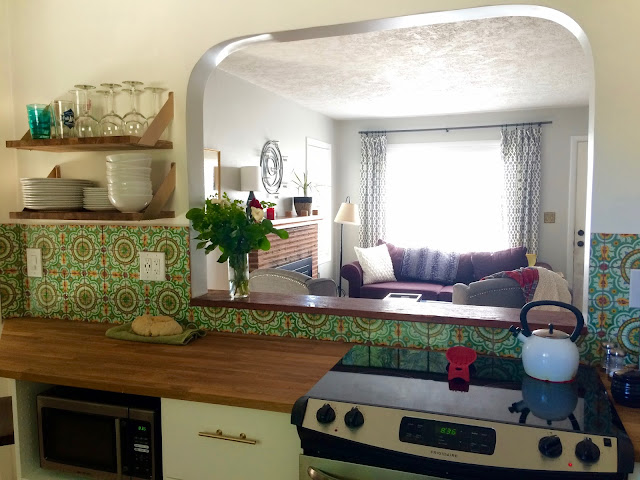 |
| How I love that view! Ahhhh... |
 |
| So. much. dust. |
 |
| The Death Trap That We Didn't Know About (aka I was cooking for 2.5 years under a giant cabinet held up by 4 nails) |
The project started on a balmy Labor Day weekend, many months ago. It seemed like a good time to start a project like this. Little did we know that we would be hosting friends almost nonstop for the next 2.5 months (which was actually great for us to have extra help, but, uh, sorry friends!) And little did Ruben know that the electrical situation of this old kitchen would be so utterly frustrating. But he spent a bajillion hours doing research, and getting help and advice from friends, and just figuring that bizz out! I'm sure there were times when he wanted to just inconspicuously light a match and walk away as the whole thing went up in flames, but he didn't. So, thanks. You are a rockstar! Also, friends who helped in this stage where I was just staying away from the house or ordering 13 faucets and 5 sinks from home depot...thanks.
|
Many stages of progress.
 |
| This guy does it all! |
|
 |
| Finally the blank slate! October 2015 |
In planning the kitchen remodel, we had lived with the old setup for over 2 years, so we had a good idea of what we hoped to change to make the space work better for us. Number one was making sure that we would have lots more counter space, by adding another wall of cabinets. We also weren't crazy about the upper cabinets, and figured out that we could get just as much storage usefulness (or more!) out of some well planned lower drawers and a small open shelving area.
We also noticed that when we had people over, or just on a normal night when it was just the two of us, no one spent much time in the living room. We tend to gravitate to the kitchen or to the dining room, and there was no line of sight from either of those places into the living room. So! Knock down a wall like they do on Fixer Upper! We decided that a completely open floorplan didn't mesh with the layout or era of the house, so we went halfway by opening up a passthrough with a cute little arch to match the doorways to the dining room and to the bedrooms. Already it makes such a difference in helping the living room-kitchen connection!
 |
| You can't tell by his face, but he was so happy to have half the kitchen finally functioning. Especially because we were hosting his birthday part the next day :) |
 |
| The real before, when we had just bought the casa and were getting ready for floor refinishing. What did we see in this place!?!? |
Now on to the before and after pics, so we can remember the dramatic change that the kitchen has undergone! The kitchen used to have cabinets on only one side, and they were original to the house and quite literally falling apart. They were attached to a pretty hefty soffit, which seemed to prevent light from coming through the window. The countertops were yellow laminate, and there were poorly-stenciled vines all over the place. People used to suggest that I do a little in-the-meantime update by painting everything, but I kindof liked keeping all that crazy in front of my face to fuel my passion to just start over!
 |
| The kitch, circa August 2015 |
 |
| Ta-da! |
The opening for the refrigerator was too small to fit our modern beast of a machine, so it sat in the corner on the other side of the kitchen, blocking the doorway that we closed off to expand the bathroom. The stove was also plopped down on that side, under the biggest cabinet known to man. Cooking with setup is how I realized that I deeply appreciate having some counter space next to the stove top!
 |
| The inside wall, circa August 2015 |
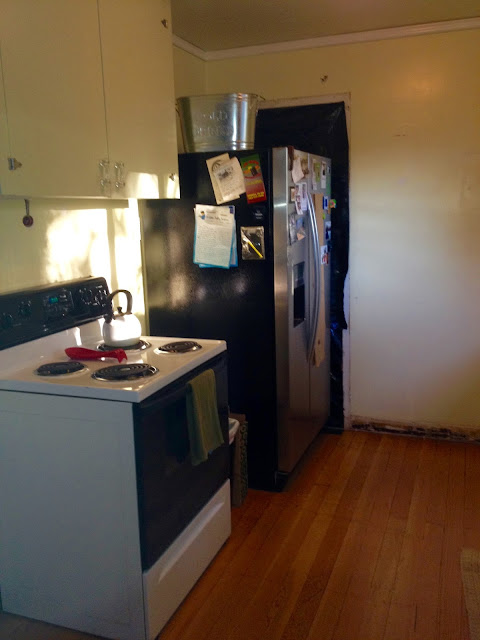 |
| Other part of the inside wall, with the remnant of the doorway to the old hallway that became part of the bathroom. |
I know that Ruben doubted my "design decisions" during most of the remodel, but now that it's all done, he finally agrees that it comes together pretty darn well. We picked basic Ikea lower cabinets and butcher block countertops, because I just love the white and wood combo, and it's like a squillion times less expensive than any other choice. I was really determined to get brass hardware, which Ruben fought hard against. But it's just so purty! He was also against the black faucet, but I am nothing if not persistent, and I used my best tactic, which was to overwhelm Ruben with options (13 faucets) and wait for him to eventually give in. Muahaha! The open shelves were made from leftover countertop, and shelf brackets that I spray painted.

 |
| So many butts! |
Ruben found this great piece of old wood at a reclaimed lumber kind of place, and with the help of our neighbor, cut it to fit the passthrough opening. In its previous life, it used to be a bleacher in a school somewhere around. And all the gum that was stuck underneath it is confirmation! Just imagine all the butts that have sat upon this countertop, and where they are now! Could they be grandparents? Great-grandparents? We'll never know.
And the tile! Oh, the tile! We decided to look around for some when we were in Mexico in the fall, because I had been having so much trouble finding anything I like that didn't cost a fortune. We came across this tile after wandering around Tonolá, Guadalajara for a lot of hours, after stopping by a handful of banks and realizing that somehow our debit card had been blocked (a long saga that followed us through parking ticket payments and all the way to Puerto Vallarta!) I thought to myself how fun it would be to have something in our kitchen that would remind of us this fun vacation! Well,it would have saved a lot of hassle if I would have just bought a painting or a flower pot. We bought many more tiles than we actually needed, and then lugged them around with us for the next week, managed to pack them to fly home with us, bought them their own tickets because they were so heavy, and handed them off to the friendly airport staff who put "Fragile" stickers on them and then threw them onto the conveyor belt.
Obviously the end of the story is that half the tiles got broken on the journey (good thing we got so many!), and now we are so tied to these tiles because of our mutual journey and sacrifices that we will love them forever. But the moral is: if at all possible, just buy a painting! Or, if you must have the Talavera tiles, buy yourself a cute little trivet that you can look at lovingly as you put it under your enchiladas!
 |
| After a 4 month break, we finally got the tiles up! Hallelujah! |
 |
| So much lighter and brighter than it started! |
The back wall of the kitchen has not yet reached its "full potential", but we are still calling the kitchen done-zo. Because waiting for a decision to be made an implemented would be AGONY. But, we are fully open to suggestions! What should we do with that big blank wall, whether functional or purely aesthetic?


Oh but those tiles are so much better than a trivet! ;)Its so cozy and warm and I LOVE the brass handles. And its not dated. Lets see...if it were Ben he would probably paint something on that wall. I would be more likely to hang a giant piece of art or/and a cool shelf for cookbooks
ReplyDeleteThe kitchen looks amazing, nice job! I can envision a shelf for cookbooks like Janell Mentioned above and a hanging herb garden too.
ReplyDeleteYou two have done an AMAZING job, and your persistence is admirable! :) I think that blank wall is crying out for a Laura vanDuren original! :)
ReplyDeleteOh yeahhhh! A Katrina original would be even better. I know you can draw woman! I love seeing the progress shots, you two did a beautiful job at transforming the place into a cozy updated palace. It reminds me of how we tore out the old Chianti shag rug era fengshwucked look back when Kat was just a baby.
DeleteI hope you will be posting the next artwork, meaning the babe that is in the oven right now!
Thanks for all the suggestions, friends! Still mentally in process...
ReplyDeleteFound you through the AT post - totally impressive! I'm loving the wall shelf brackets. Do you mind sharing where they're from? Thanks!
ReplyDeleteThey are from amazon and I spray painted them a brass color! Thanks for the compliment!
Deletehttps://www.amazon.com/John-Sterling-0051-8WT-Bracket-8-Inch/dp/B00E5ZFMYK/ref=pd_sim_sbs_201_2?ie=UTF8&dpID=31nu7yrbFqL&dpSrc=sims&preST=_AC_UL160_SR160%2C160_&psc=1&refRID=W5B9GHDZTK6YB7E68XRY
Take the Flower portion of the tile and paint a larger version on the wall. Under the Flower, set up shelves with the wall shelf brackets you are already using, so that it imitates the brown of the frame for the Flower in the tiles. Maybe pick up some brass florets or something to bring the suggestion of the tile frame to completion.
ReplyDeleteBrilliant job!! I can imagine some mosaic from the broken tiles on the empty wall ;)
ReplyDeleteThanks Alexandra!
DeletePaint the blank wall with chalkboard paint. It'll tie in with the black faucet (drool), and give you a place to be mucho creative.
ReplyDeleteOoooh I like this idea! I've also heard that they can make chalkboard paint in any color. The options are endless!
DeleteLove the choice of tile and the warm wood countertops! Thank heavens for DIY skills and lots of patiences but the result is just lovely and unique to you!
ReplyDeleteThank you Carol!
DeletePaint the back wall a green color from the tiles. Then hang a rockin piece of art ;)
ReplyDeletePiece of art in the middle and counterdepth shelves of wood and brass against the left wall. Love the tile! It makes the kitchen.
ReplyDeleteI love how this kitchen came out! For your leftover tiles, make a little mosaic side table or shelf or whatever with those broken tiles. I use those talavera tiles on lots of projects around the house. I made a table from a bunch. get a round piece of wood (or square) from HD, seal it (red guard if using outside) and go to town! Grout and viola! I attached my wood to some iron hair pin legs for a patio table. You can see it here: ( just scroll down until you see the two mosaic tables) http://makemeprettyagain.blogspot.com/p/mosaics.html
ReplyDeleteAwesome idea! Thanks Beth
DeleteThank You and that i have a keen offer you: How Much Remodel House modern home renovation
ReplyDelete